You can find the newest OpenScad File on Printables https://www.printables.com/model/72839-stable-and-waterproof-electronic-box-enclosure
Fixed version 7.3
It seems that special characters in the code have again led to the code not working properly for some. I apologize for this. I have now created a new version 7.3 where this is fixed. I would be very interested to know if everything works as expected for you now. Thanks for your feedback in the comments


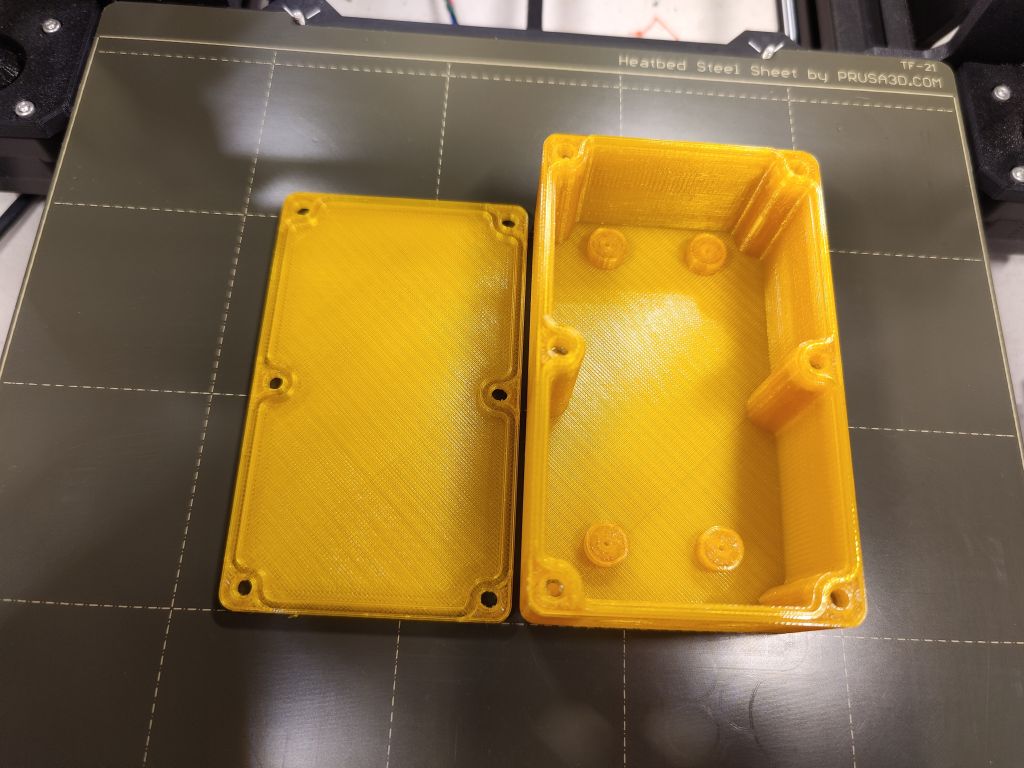
Stable and waterproof OpenSCAD case V7.2 by pbtec
New Version 7.2 out!
Enhancements in Version 7.2:
- Hot melt copper nut support
- Screw hole options: Can be configured to pass through the entire case, with the option to position the nut at the bottom of the case
- Flexible mounting options: 1 to 3 holes on all sides for cable glands or switches
- Improved PCB support: Now compatible with up to 3 different PCBs holders instead of just one
- Base bottom mounting holes added (not recommended if the housing should be highly waterproof)
- Gasket can now be printed (TPU).
- Expanded screw support: In addition to countersunk screws, round, flat, and hex head screws are now supported
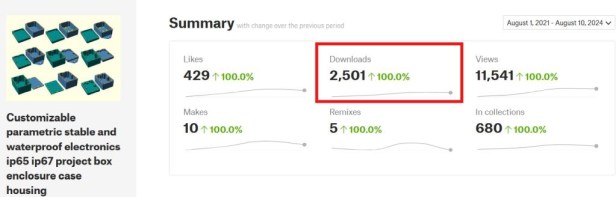
Edit August 24: More than 20’000 downloads!
The case has now been downloaded an incredible 20,000 times worldwide on both Thingiverse and Printables!

Highly scalable electronic case for 3D printing. Try it out!
Optimized for Openscad Customizer. Activate it under view/customizer and play around 😉
No Support needed to print
For waterproof cases you can use silicone sealing cord with diameters from 1 to 3mm
If you want to support my project, please use the links below to start your shopping. No additional charges for you, but I get a commission of your purchases
Brass hot melting insert nuts (starter) sets:
https://s.click.aliexpress.com/e/_DezuAlH
https://s.click.aliexpress.com/e/_DeWsPMp
Or individual sizes:
https://s.click.aliexpress.com/e/_DkaQObj
https://s.click.aliexpress.com/e/_DCrO22p
I also recommend using special hot iron to insert the nuts in the right angle:
https://s.click.aliexpress.com/e/_DcHd8Ep
round silicone sealing cord foam white
Aliexpress: https://s.click.aliexpress.com/e/_AdVXC6
Ebay: https://www.ebay.com/itm/184394411044?mkcid=1&mkrid=711-53200-19255-0&siteid=0&campid=5338823684&customid=&toolid=10001&mkevt=1
round silicone sealing cord foam black
Aliexpress: https://s.click.aliexpress.com/e/_A32aUQ
Ebay: https://www.ebay.com/itm/353309685702?mkcid=1&mkrid=711-53200-19255-0&siteid=0&campid=5338823684&customid=&toolid=10001&mkevt=1
round silicone sealing solid cord white
Aliexpress: https://s.click.aliexpress.com/e/_A07nM2
Ebay: https://www.ebay.com/itm/133527877200?mkcid=1&mkrid=711-53200-19255-0&siteid=0&campid=5338823684&customid=&toolid=10001&mkevt=1
To use also without sealing cord. The groove and ridge gives the housing a high stability and tightness.
Use of regular nuts or square nuts
Define outer vertical radius of corners
Echo output in console shows inner and outer size and more
Echo output shows the needed length of the screws
Use screws from m2 up to m5
Default are 4 screws at each corner. For large cases add addtional ones in the middle of both x and y sides if needed
Use several predefined wall mount holder, some with multiple mounting holes (up to 3)
Important!
If you use standard nuts you need to pause the printer a certain level to insert the nuts
If you need a stable and waterproof case please print with 100% infill
I’m aware that sometimes, when using too big or too small parameters, there are some rendering issues.To prevent such issues change only one parameter at once and check the result.
I never tested the water proofness of this case. For more information see https://blog.prusaprinters.org/watertight-3d-printing-part-2_53638/
For Projects with ESP32, ESP8266, Arduino, Sonoff, IoBroker, IoT. In- and outdoor 🙂
use https://paypal.me/pbtec if you want to spend me a coold beer. Thanks in advance 🙂
The latest version 7.0 is currently still in the development phase.
There are the following improvements planned:
– Parameter to add a bit more countersink for the screws
– Nuts on bottom
– Use of tapping Screws (Parker screw)
– Use of Knurled Hot-melt Insert Nut
– Additional cuts to check inside of Screw/Nut
You can find the OpenScad File on Printables https://www.printables.com/model/72839-stable-and-waterproof-electronic-box-enclosure


really looking forward to the 7 version
can you make a regular box?
LikeLike
Maybe this one? https://www.printables.com/model/268858-easy-parametric-box-enclosure-for-electronic-proje
LikeLike
Enhanced Version of my regular box available. See: https://www.printables.com/model/863273-easy-customizable-parametric-electronics-project-b
LikeLike
really looking forward to the 7 version
can you make a regular box?
LikeLike
Sorry, what do you mean with „regular box“?
LikeLike
https://ibb.co/YZN6BsG
standard, not waterproof
LikeGefällt 1 Person
Maybe this one? https://www.printables.com/model/268858-easy-parametric-box-enclosure-for-electronic-proje
LikeLike
Maybe later… But you can use this one also without sealing cord. It is even more stable than a regular one.
LikeGefällt 1 Person
Enhanced Version of my regular box available. See: https://www.printables.com/model/863273-easy-customizable-parametric-electronics-project-b
LikeLike
show 7 version! 🙂
LikeGefällt 1 Person
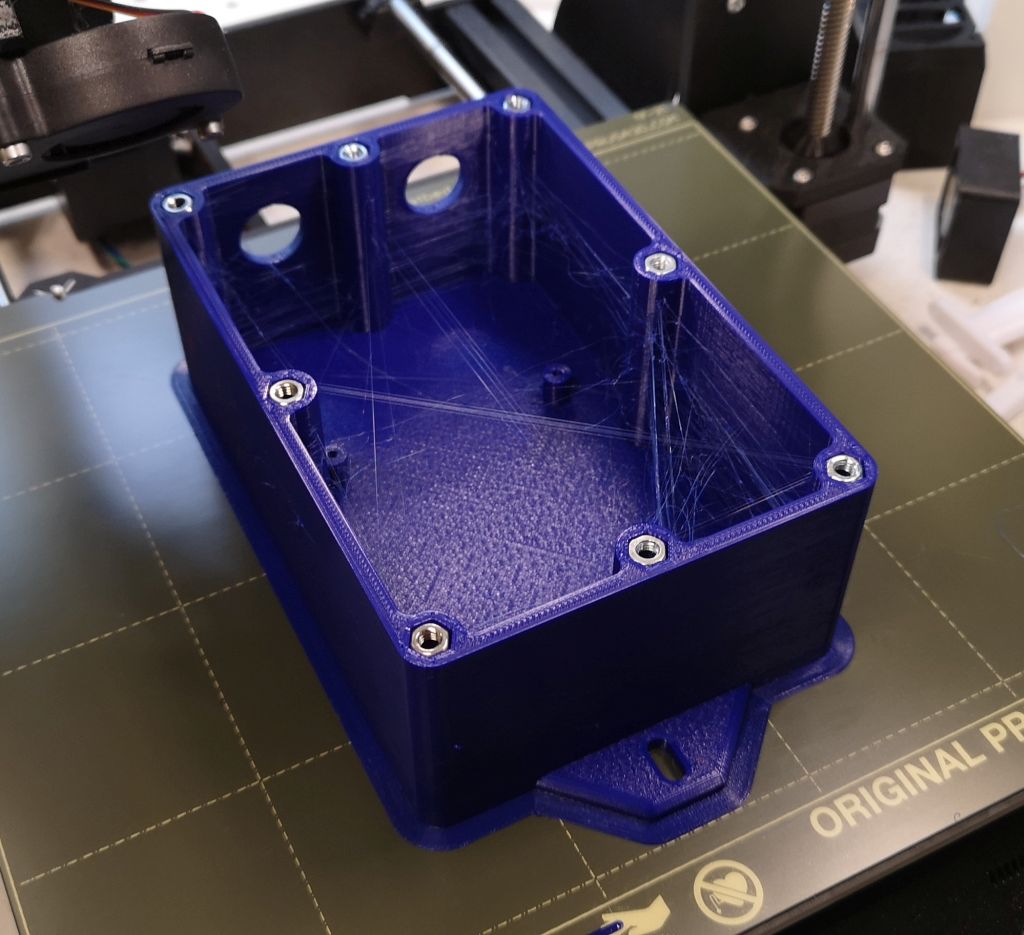
https://ibb.co/Trm1S3G
your case for wireless temperature sensor
LikeGefällt 1 Person
Cool, great job. But I’m also a little proud of myself 😉
LikeLike
Hi,
it is perfect job, one question…any way how to make wall holes for cable gland on the booth X or Y sides? Not only on one side?
Thanks for answerback.
Martin.
LikeLike
Hi Martin
You need to add the corresponding command in the „// **** Add your bottom case cuts here ****“ section in the script. Sorry, but I cannot teach you in Openscad language, but try something like
translate([0,40,15]) rotate([90,0,0]) cylinder(h=15,d=20,center = true);
or
translate([30,0,15]) rotate([90,0,90]) cylinder(h=15,d=20,center = true);
You can check the location of your cut out by adding a „#“ at the beginning of the command.
For more information see https://en.wikibooks.org/wiki/OpenSCAD_Tutorial
You can also print the case without the holes and drill them
Happy new year!
LikeLike
You can also load STL model into tinkercad and make a hole where needed
LikeGefällt 1 Person
Thank you for this model! I do have a question: how can I know the inside dimensions (if I’m trying to fit something in) before printing? I see the wall-to-wall dimensions, but that doesn’t take into account the cut-out areas. I need to know the dimensions of the available space to fit e.g. a wireless sensor.
LikeLike
Hi. In the console you can see two values for x and two for y dimension. One is „Wall to wall“, the other is, I guess the one you are looking for: „Screw cylinder to screw cylinder“. Compare this value with you wireless sensor.
LikeLike